Table of Contents
Intro
Webparts are the basic building blocks of SharePoint sites. Below are "recipes" on how to build specific web components in Powell for SharePoint Sites. For more information on Webparts, you can check the reference here.
Grid List of Links
TL:DR;
"use graph webpart and then application tiles widget view and set 3 per row"
~ Dah Master

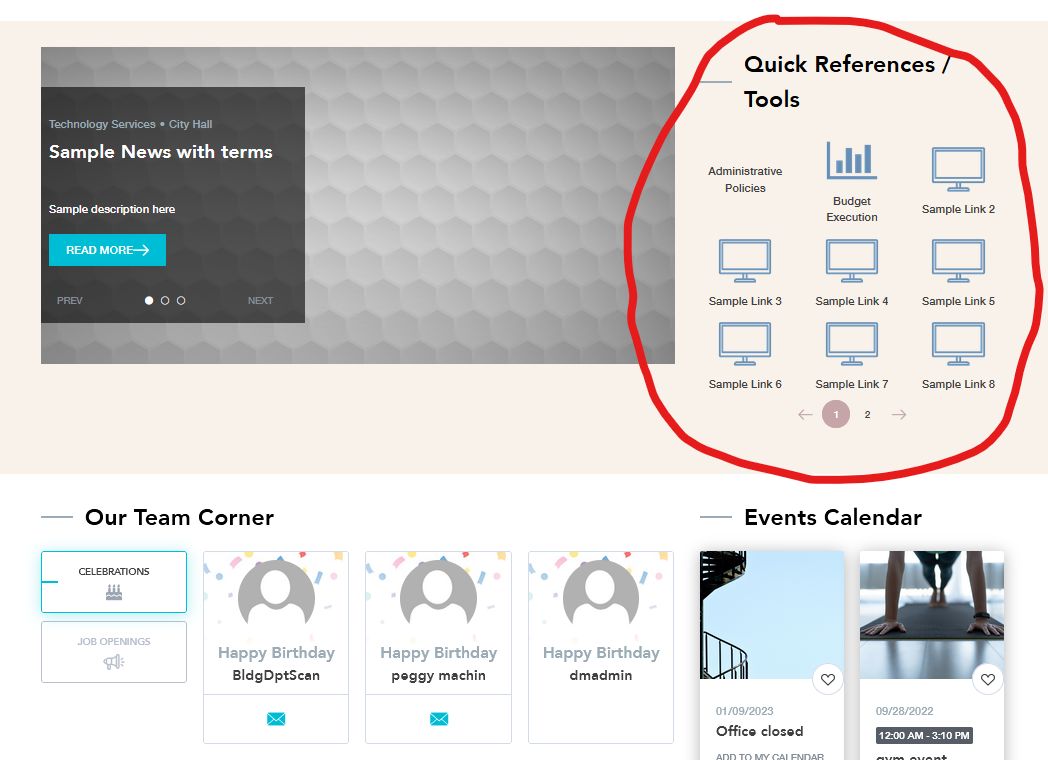
What We Are Making
A list of accessible links is one of the most commonly requested requirements that clients ask for in SharePoint sites. To create this grid style list of links with icons, perform the following steps.
In Powell Manager
Create a Custom Content Type
Here, we will be creating a custom content type that inherits from the standard Item Content Type. It will contain additional fields for image, number, and URL.
- Create a new item content type
- Create an image field: Select a field type, choose Image.
- Create a number field: Select a field type, choose Number.
- Create a URL field: Select a field type, choose URL.
- Save
Create a List Template
In Powell Manager, the list template is used by the web part widget. If you already have this list template, then you can skip this section.
- Create a new list template
- Select a list template model to inherit from dropdown, select Generic List
- Content Types
- Add a new content type
- Add an existing content type
- Under Custom content types, choose the custom content type that you created. Add it
- Save
Create new List from List Template
- Create a new list
- Under Select a list model dropdown, select the list template that you created under My List Templates
- Save and Sync
Add to Site Template
- Add a Webpart
- Use the Graph web part
- Scroll down to Display
- Select a widget view
- Use the Application Tiles widget
- Set the following
- Title
- Site Url to your sharepoint site Url
- List to Manual value. Type in the list that you created
- Sort Property to the Internal Name of the number field of your custom content type
- Sort Direction descending or whichever you prefer
- Row Limit to however many rows you want to limit to. For example, three pages of 3x3 items, we would want 27. The following are recommended numbers, but do what fits your needs:
- Mobile item's per row to 2
- Tablet item's per row to 2
- Desktop item's per row to 3
- Large screen item's per row to 3
- Under Mapping
- Choose Map as Publishing Field, for title, type Title
- Choose Map as Publishing Field, for your custom image field, type its internal name
- Choose Map as Publishing Field, for your custom number field, type its internal name
- Choose neither checkbox, for your custom URL field, type its internal name
- Save and Sync
In SharePoint Site Contents
Create Items For the List
- The (+) sign next to the gear wheel,
- Choose the list that you created
- Fill in the fields.
- Create as many items in the list as needed.
Combined Search Videos
TL:DR;
"use
FileType: mp4search query"~ a Student

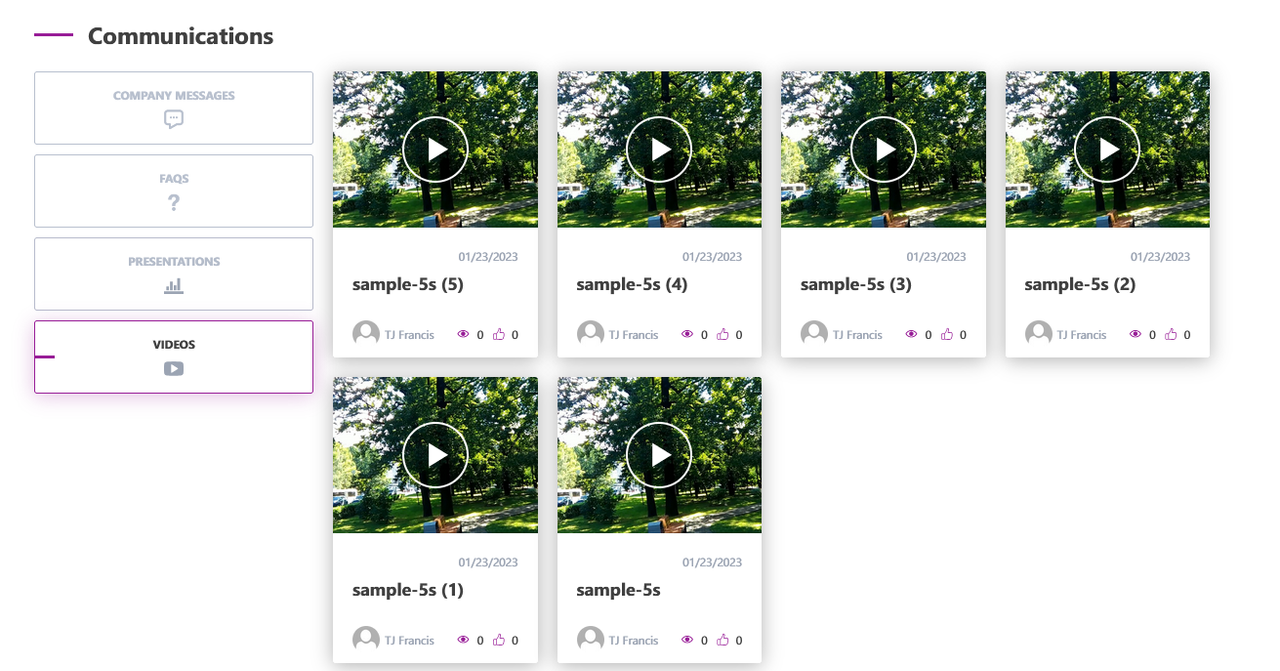
What We Are Making
A list of videos as part of a combined search webpart. You may wish to create the videos files first because the search query might be based on where you stored your videos in storage.
In Powell Manager
Add to Site Template
- Add a Webpart
- Use the Combined search webpart
- Scroll down to Configuration
- Select a widget view
- In our case, we will be using the Vertical widget, but feel free to use what you need.
- Set the following:
- Title
- New Configuration. Set the following:
- Title
- Search query template
- Row limit
- Display -> Select a display type -> Select a widget view
- Under Must read items, set the following to your needs or the following parameters
- Mobile item's per row to 1
- Tablet item's per row to 1
- Desktop item's per row to 4
- Large screen item's per row to 4
- Save the Configuration
- Save the Webpart
- Save the page template
- Sync the Webpart
- Go back to Edit Site Template
- Save all site templates.
- Sync the site template that you were working on.
In SharePoint Site Contents
If you do not have any content to upload, I recommend downloading sample video content from here.
Create Videos Files
- Go to site contents
- Create a Document Library Folder with the same name as what you specified in your search query
- New. Choose from your computer and upload the sample video files
Title Text Statement

What We Are Making
A paragraph with a mission statement and title with horizontal dividers. This turns out to be a web part with many pieces.
In Powell Manager
Add to Site Template
- Add the following Webparts to a single zone
- Title
- Set Chrome type for title to hidden
- Divider
- Text
- Set font size to 30 and alignment center
- Divider
- Title
- Add the following code to Custom CSS
hr[role="presentation"] {
    color: #981d97;
}